CLICK HERE FOR FREE BLOGGER TEMPLATES, LINK BUTTONS AND MORE! »

Tuesday, January 17, 2012

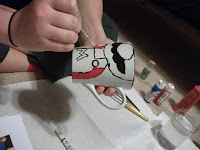
Project: Character Cups


Our names are Lacey and Lindsay, and we're Mario-holics.  If you have a crazy obsession with television or game characters, this project will make you jump for coins....erm, I mean joy. :)


 What you need:
Coffee Cups (Dollar Tree Special :D)
Acrylic or Ceramic Paint (depending on the finish of your cup)
Expo or Vis-a-Vis markers
Napkins or newpaper
Paintbrushes
A creative mind or a model picture of the character


 Step One: Take your dry erase marker and sketch your character onto the cup.  If you're a bad artist, *cough*LACEY*cough*, feel free to give your partner this responsibility.


 Step 2:  Apply the first coat of paint to your cup.  Allow to dry, then use your fingers or a cloth to remove any remaining marker.  Add the second coat and allow to dry.  We outlined our characters to make them appear bold and finished.  You may use your own painting style....or lack thereof.  If you so choose, top with a glossy finish to add shine and protection


This project may not help you save Princess Peach, but it's purpose will give you the energy you need to do so!  Happy gaming! :D


Note: We recommend that you hand wash your new favorite cup.

Project: Tee Shirt Scarf

     "Excuse me miss, but where did you get that beautiful and flattering scarf?"  I'm sure many of you will be thrilled to admit that you made this yourself!  Be prepared to surprise your friends and show off your style and creativity. :) This one is super easy, you really can't go wrong.....unless you lack opposable thumbs. :)


What you need:
A few old tee shirts and tanks
Scissors
Needle and Thread
Creativity and Patience


To begin, cut 1 inch strips of fabric from your shirts and tank tops.  You can cut side to side or top to bottom, depending on how long you want your scarf to be.  If you go from side to side, make sure to cut the sides to make it a strip rather than a tube shape.


Using strips from several different fabrics, braid and assemble pieces of different lengths.  We used 1 to 2 braids in our scarves, but feel free to be creative and see what you can do.  We also took individual strips and incorporated them into our design.


Once you have your scarf assembled the way you want it, secure it by cutting a shirt sleeve down the seam to wrap around the adjoining ends.


Take both ends of your scarf and tie together (we used an extra fabric scrap for added security). 

                                                      
Then, tightly wrap the sleeve around the ends to create a clean finish.  Stitch the sleeve together and also attach it to pieces of the scarf itself in order to secure it in place.


SHAAAAZAMMMMM!  You have a unique and jaw-dropping (not really) scarf made with lots of love (or two tablespoons of boredom). :)

PS:  We suck at taking pictures together right after the project, so you don't get to see Lacey's face :(  Or her scarf, which was SOOOOOOOOOOOOOOOO much cooler than Lindsay's.  By the way, can you tell who wrote this part? ;)


Sunday, January 8, 2012

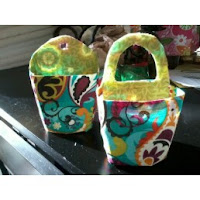
Project: Wall Pocket

After countless nights of hearing Lacey complain about losing her phone in the bed sheets at night, we (mostly Lindsay, she's the one with the bright, sometimes not so bright plans ;)) brainstormed a handy cell phone wall pocket!  This can be placed beside your bed, or on the headboard itself. Hope it helps all you people who lose your phones in your sheets at night like us!


Things you need:
  • Plastic bottle that will fit your phone (we used lotion bottles)
  • Cute fabric (we used 2 different ones, for inside and out)
  • modge podge (or white glue and water, if you're cheap like us)
  • medium sized paintbrushes
  • hard surface that you don't mind getting a bit messy 
  • scissors
  • exacto knife
                                                                                                      

First step to creating this handy phone pocket: Pick out your bottles to fit your phone. We just went to the dollar store and browsed through the lotions and soaps until we found these.


Then draw out the shape you want yous to be. It's helpful to leave a higher back so you have something to attach it to the wall, like so.. And make sure it fits your phone the way you want it too. Some may like the front low, so it's easy to pull your phone out.


Now you want to cut out some pieces of fabric to fit your pocket. Then start applying your modge podge (or watered down white glue) very liberally to the fabric on the plastic. We started with the handles since that was the hardest.
Continue gluing the rest of your fabric on until you have it the way you want it!
Let it dry over night and cut off any excess you have hanging off, and add cute accessories to make it 'you'! We just tied some matching ribbon to it.
Now you can hang your pocket beside your bed so you can reach it in the middle of the night ;) We used a command strip so we wouldn't have holes in our walls.. they're quite sturdy too!


Vote for our blog here!